
Basement Framing and Renovation: A Neighborly Guide to Transforming Your Space
- марян никорчук
- Feb 9
- 4 min read

When I first thought about renovating my basement, I was a bit overwhelmed. The idea of framing walls, installing drywall, and turning a cold, unused space into a cozy living area seemed like a big job. But with the right approach and some practical tips, basement framing and renovation can be straightforward and rewarding. If you’re in Palatine or nearby suburbs, this guide will walk you through the essentials, sharing what I learned along the way.
Why Basement Framing Matters in Your Renovation
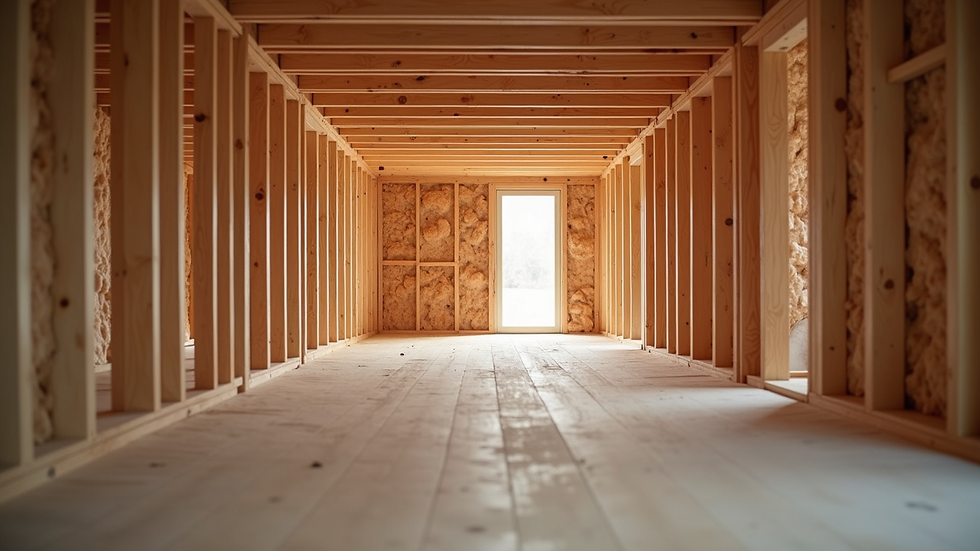
Basement framing is the backbone of any basement renovation. It’s the step where you create the structure for your new rooms, whether it’s a family room, a home office, or a guest bedroom. Proper framing ensures your walls are straight, your space is well-organized, and everything is ready for drywall and finishing touches.
When I started, I realized that framing isn’t just about putting up wood studs. It’s about planning for insulation, electrical wiring, and plumbing. You want to make sure your basement stays warm, dry, and functional. Here are some key points to keep in mind:
Use pressure-treated lumber for the bottom plates to resist moisture.
Space your studs 16 inches apart for strong, stable walls.
Plan for doors and windows early to avoid costly changes later.
Leave room for electrical boxes and plumbing pipes.
Framing sets the stage for everything else. If you get this right, the rest of your renovation will go smoothly.
Essential Steps for a Successful Basement Renovation
Renovating a basement involves several steps, and framing is just one part. Here’s a simple breakdown of the process I followed, which you can adapt to your project:
Assess the Space
Check for moisture issues, leaks, or cracks. Fix these before you start framing to avoid problems later.
Design Your Layout
Decide how you want to use the space. Sketch a floor plan with room sizes and door placements.
Prepare the Area
Clear out the basement and clean the floors. Mark your wall lines on the floor and ceiling.
Install the Bottom Plates
Use a chalk line to mark where the walls will go. Secure pressure-treated lumber to the concrete floor with concrete screws.
Build the Wall Frames
Cut studs to the right height and nail them to the bottom and top plates. Make sure everything is level and plumb.
Add Blocking and Headers
Install horizontal blocks for extra support and headers above doors and windows.
Run Electrical and Plumbing
Before closing up the walls, have your electrician and plumber install wiring and pipes.
Insulate and Drywall
Add insulation between studs, then hang drywall sheets and finish with mud and tape.
Each step builds on the last. Taking your time and doing it right pays off in a beautiful, functional basement.
Choosing the Right Materials for Basement Framing
One thing I learned quickly is that not all materials are created equal, especially in a basement environment. Basements can be damp, so choosing the right materials helps prevent future headaches.
Pressure-Treated Lumber: Use this for any wood that touches the concrete floor. It resists rot and moisture damage.
Metal Studs: These are an alternative to wood and are great if you want extra resistance to mold and pests.
Moisture Barrier: Install a plastic vapor barrier between the concrete and framing to keep moisture out.
Insulation: Use foam board or fiberglass insulation designed for basements to keep the space warm and dry.
I found that investing in quality materials upfront saved me money and stress down the road. It’s worth it to avoid repairs later.

How to Handle Common Basement Renovation Challenges
Basement renovations come with their own set of challenges. I ran into a few, and here’s how I tackled them:
Moisture and Water Issues
Before framing, I sealed cracks and installed a sump pump. If you notice dampness, address it first.
Low Ceilings
Basements often have lower ceilings. I planned my framing to maximize headroom and chose slim-profile lighting.
Uneven Floors
Concrete floors can be uneven. I used shims under the bottom plates to level the walls.
Limited Natural Light
Basements can be dark. I added extra windows where possible and used bright paint colors and lighting.
Building Codes and Permits
Check local codes before starting. I made sure my framing met all requirements and got the necessary permits.
Facing these challenges head-on made the project smoother. Don’t hesitate to ask for professional advice if you’re unsure.
Tips for Working with a Local Renovation Crew
If you’re like me, you want a team you can trust. Neighbor’s Handy Crew in Palatine was a great choice for my basement project. Here’s what I recommend when working with a local crew:
Clear Communication
Be upfront about your goals and budget. Good crews listen and offer solutions.
Check References
Ask for past project photos and reviews. A reliable crew will have plenty of happy customers.
Get a Detailed Quote
Understand what’s included and what’s not. This avoids surprises later.
Stay Involved
Visit the site regularly and ask questions. It helps keep the project on track.
Respect Their Expertise
Trust their advice on materials and methods. They know what works best in your area.
Working with a local team means they understand the unique needs of homes in our region. It’s a partnership that makes your renovation stress-free.
Making Your Basement a Cozy, Functional Space
Once the framing and drywall are done, it’s time to think about how you’ll use your new basement. Here are some ideas that worked well for me:
Create Zones
Divide the space into areas for relaxing, working, and storage.
Add Built-Ins
Shelves and cabinets keep things organized and add character.
Choose Durable Flooring
Vinyl plank or carpet tiles are great for basements because they handle moisture well.
Use Warm Lighting
Layer overhead lights with lamps and sconces for a cozy feel.
Personalize with Paint and Decor
Light colors open up the space, and personal touches make it feel like home.
Remember, your basement can be anything you want it to be. With good framing and renovation, it becomes a valuable part of your home.
If you’re ready to start your basement project or need help with repairs and upgrades, Neighbor’s Handy Crew is here to help. We specialize in quality workmanship and clear communication, making your renovation a breeze.
Happy renovating!


Comments